31 |
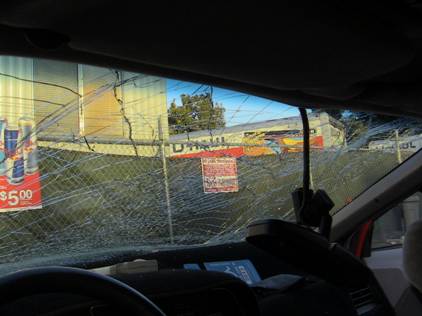
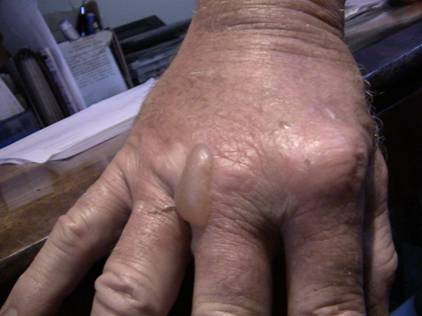
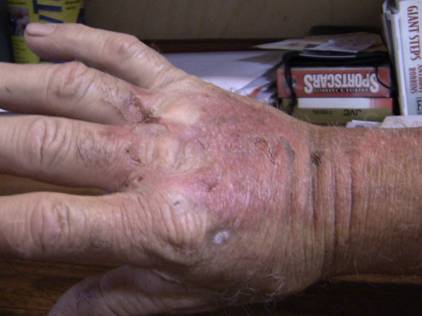
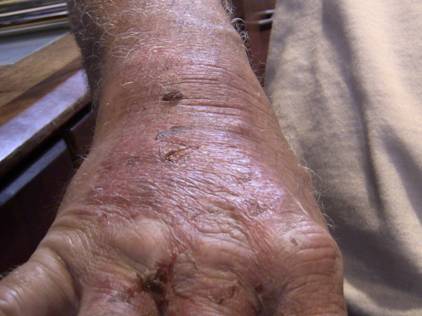
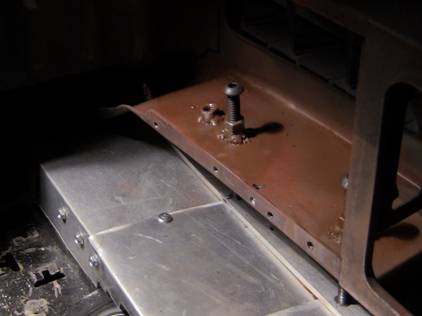
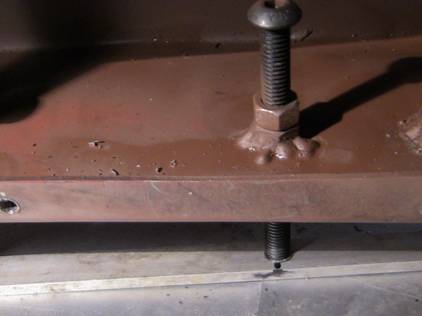
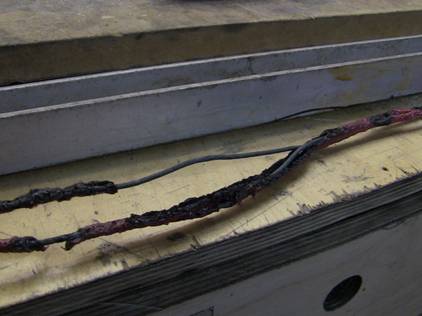
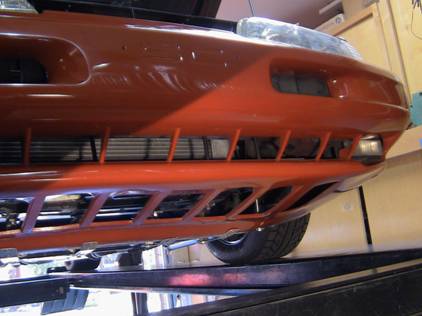
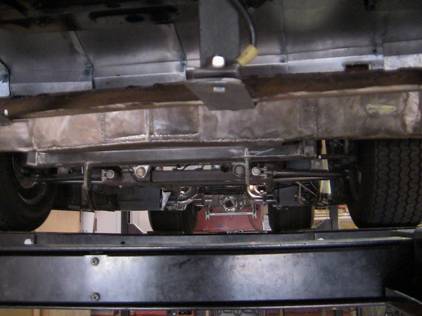
4/21/12 The Bird has a little water leak. I drove around in 100+ temps today with AC going, and it got a little warm under the hood. I heard a hissing off the manifold. Sounds like the heater hose on top is leaking from the AN fitting at the front. I’ll do some checking again tomorrow. For now, no long driving. 4/26/12 I tightened the fitting and the bung in the manifold, then on a consequent drive to Northridge found I had a major fuel leak. I apparently pried up a tad on the adjacent fuel rail. I changed all 16 O-rings on that side, and no more leak. There still remains some exhaust leaking, but overall the exhaust/fuel smell issue is nearing completion. The brakes suddenly went to the floor with scarily insufficient stopping power. PBB came home late this afternoon, and bled the brakes, All better now. But where did the fluid go? I also find I have mismatched studs on the left rear wheel. Two are ½ x 20. The others are 7/16 x 20. I ran a tap through both sizes of nuts and they fit the appropriate studs. But something got changed there back when. I drove a 100-mile round trip to Scottie’s last night, and aside from the exhaust issue, the car ran great. 5/3/12 The car went into limp mode for no apparent reason. I tried unplugging it. No workie. I then unplugged the left battery for a few minutes and presto, all better. VERY strange. There is a constant smell of gas/exhaust, and I have to cure that. It is MUCH subdued from previous times, but still present, even when the car has been sitting. That HAS to be the tank. 5/9/12 I spoke with Jim at Rewarder Headers, asking if slip-tube headers leak? YES. He ordered some header cement, about the consistency of JB Weld to put in the tubes. He claims it works, and still allows for the tubes to be removed. The temp has been 100+ for a couple of days, and the Bird runs in the hotter range after considerable City driving. I am trying an experiment: I have taken the puke tank off, and run the overflow line into the intercooler reservoir. It is the same fluid, a 50-50 of water and glycol. So I am trading a little charge cooling for essentially unlimited overflow and suck-back capability. So far, it seems to be working. I am working now on finding ways to relocate the three offending coolers in FRONT of the radiator: 1-The AC condenser, about 28 x 17 2-The trans cooler, about 15 x 10 3-The charge cooler, around 7 x 17 I can tuck the two smaller units up inside the left front fender behind the headlight with no problem, or put them aft under the pockets at the front of the rear tires. The right side of these had the fuel pumps there previously. But up front is less plumbing, and pretty simple. Finding a spot for a 28 x 17 radiator is tough. It is too tall to fit upright in the trunk. It would therefore have to lay flat in the trunk, obviously above the floor, with fans. OI might need to rig up some kicker something to lift the trunk slightly to allow for airflow OUT of the trunk. I could put it directly under the front crossmember, but it is subject to damage there. I am looking into some perforated stainless sheeting I have here as a rock guard. This is really the only possible spot. Should I be able to relocate these three pieces, I could then put a double-thick radiator in the present location, and gain some cooling capacity that way. However I do it, I need some more cooling to feel secure, and allow me to use the AC on hot days. That is, of course, the purpose of AC. There also remains the possibility of just adding a 28 x 14 radiator in the trunk, and leaving all else the same. But this fourth possibility is low on the list now. The Dynomax VT replacement mufflers arrived, and Kenny at Sepulveda Muffler will install them Friday morning. 5/10/12 JJ and Kelly and I did some brainstorming on alternative placements for the cooling stuff: trans cooler, charge cooler, AC condenser. There are compelling reasons to move the two smaller units to the rear tire area, and also to put them up under the front valance, and also to put them in the left front fender area. The simplest would be to drop them into the valance. The issue is airflow, and whether putting them there would negate the benefit by restricting flow from the ground through the splitter. The main deal is to get the condenser somewhere else. If the condenser can be relocated, the idea of doubling the core thickness on the radiator is intriguing, so we’ll just keep on thinking and trial-fitting stuff until some action occurs. 5/15/12 The mufflers are in, and no more rattles. They are very slightly louder, but all is good. I now hear a small ticking form an exhaust leak. We’ll track that down later in the week. Meanwhile, I finally commenced action of reducing the heat load on the radiator. We have removed the three accessory coolers up front. I have had the AC evacuated for later recharge by Morgan at AirMec. I have found that I can RAISE the radiator up perhaps 3 inches, after years of working the core support to get it down. Oh well. This will provide room for the AC condenser to lay flat under the radiator and up in the front splitter. The charge cooler is going forward of the LR wheel, the trans cooler in front of the RR wheel. I have created some backeting for the trans cooler, almost done, and will continue on later today as time allows. I popped the radiator cap off after a 20-mile drive and BURNED myself pretty well: It actually toasted my arm to the elbow, but the major blisters are on the hand. This required about 40 minutes of ice therapy, after which I went about the task on the trans cooler. The idea is now that not only will I have relieved the large heat load on the engine radiator, but I can perhaps replace it with a 5-row or some such mondo core for additional cooling. I will add fans to each of the other relocated units. One little item of interest is whether to BLOW air down through the C condenser, so as not to send any hot air near the radiator,. Otherwise, what’s the point? There is road air coming in there, so I might need to add some shielding behind the condenser to make all that work correctly. I will first just drive the thing as-is in the new configuration, and then see what I can put in there for additional reserve cooling. I think this is better than the trunk mounted radiator plan! I am also gratified at how the stuff came out for the most part, showing some good planning in how it was mounted. 5/19/12 The pix do not do justice to the purple color of the affected areas. The previous picture of my burned hand was optimistic. Here’s how it looks 4 days later: The lesson: NEVER do that again!!!! The morphing of the radiator/cooling is nearly complete. The trans and charge coolers are mounted and plumbed. They do not have fans mounted on them yet, but should work OK for the moment. The core support was RAISED 2.5”, and this has provided a little wiggle room for the AC condenser below, tucked up into the splitter. I have mounted two 11” fans (courtesy of Randy) between the front structural metal behind the bumper area and the core support. The actual final position has taken a few iterations to get just right, but they are quite close now. It is VERY tight here. The fans pull significant air up through the bottom opening of the splitter, enough to hold a sheet of paper against the core. We have made a cover to go over these fans to prevent the AC hot air from reaching the radiator. So now the engine radiator will see only the upper air from the two higher openings in the front end and whatever the 4 fans suck through. I added 4 welded studs to the core support to hold the rear of the deflector, and we tech-screwed the front lip into the structural beam at the front. The AC air blows quite easily out the rear through a roughly 2” by 30” window at the back. I have also relocated the two fan relays up to the top of the frame rail to relieve the overcrowding around the AC dryer unit. That, too, is getting slightly re-positioned. As I welded on the frame, I disconnected both batteries, all four terminals, to prevent computer damage. I will add 4 relays for the new fans, and probably put the AC fans to be triggered by the AC-on pulse, as the main fans are now. Those main radiator fans will remain wired to come on that way anyway. The other two fans will likely just get some key-ON trigger from the rear cowl buss bar on the passenger side. As noted earlier, I am gratified that my previous mounting arrangements have proved serviceable. I additionally cut some of the core support at the top and rewelded it to its boxed frame. We will make a piece of polished aluminum to cover this area, although it could certainly be painted, just to add some more sweetness to the visual. I mentioned a while back that the phase 2 option of this complex renovation of the cooling would allow me room to put a deeper radiator up front if needed. At the moment, that would require making it shorter (due to the fans now mounted below it) and slightly narrower than the existing. A second discrete unit might be in order if more cooling is still needed. Ah yes, MUCH massaging has occurred in this build. 5/26/12 I purchased 5 CRC fans: (2) 12” units for the condenser, and (3) 8” units for the charge and trans coolers. I have mounted the (2) 12’s on the condenser, and modified the lower portion of the core support with a pair of 4” half-moon cutouts to clear the motors. The whole pack fits in, and is TIGHT. Kelly made a 1.5” x 31” x ¼” steel bar across the top of the motors and lip of the core support to receive the shields to go above the fans. We did some profiling to get the steps over the motors pretty tight for no major air leak there. I welded the bar in yesterday. These shields will direct the air out the back through the approximately 2” slot. I tried one fan, it sucked paper against the core, and the air moved out the back nicely. CRC failed to send me the pigtails for the fans, and is doing so now. He declined to include the push-through attachment pieces without additional cost, and wants to charge for those. I passed on that. So next up is mounting the 2 fans on the charge cooler, the fan on the trans cooler, and making the condenser shields. This will be a several-piece affair, given the curves, etc. AirMec is going to have a good time re-tubing the condenser in its new location. We’ll most likely use the softer aluminum sheeting here and tech-screw it together. Oh, and the crispy burned hand is doing wonderfully at now about 9 or 10 days later. 5/31/12 Got the radiator in and found it had TWO damaged areas in the front leaking significantly. Apparently someone knocked it over or hit it with something. Short story, Sam at Allstate fixed it for $40. Not the prettiest repairs, but functional. Got it all back together, and tightened up the trans cooler lines (which were leaking). Mounted the fan on the charge cooler (just one fan) and trans cooler, ran wires back to same, and I’ll mount some relays up in the front right cowl area, and pull power from that buss right there. Triggering them will probably be from some key-on circuit. The AC condenser shields are in, and I made a press-down bar across the front portion of them to hold them cosmetically straight, and prevent any wind from pushing them up. This required welding nuts inside the front structure, getting some long all-threaded bolts, pre-drilling the press bar to receive the tips of those push-down bolts, and adjusting it all. This was a bit of engineering per the following pix: And it all looks good. I’ll take the car for a little drive later, and see how the temp fares. It certainly should be improved. I bought a little air saw, and will give the hood a modification to the scoop inlets by removing the blocking plates there. I’m still using the charge cooler reservoir for a puke tank for the radiator. We’ll see how that goes. 6/1/12 The car performed OK last night, but was WAAAAYYYY low in the front. JJ and I raised it about an inch today with modifications to the lower skirt. We cut away about 1.5” of the very bottom of the rubberized lower material, made new lower braces, added another support on the left side, and gained about an inch overall. It looks even, and it’s all we can get. We then cut out the hood scoops. These, too, look improved. I drove it to Bob’s in heavy traffic, and the temp gauge barely got above the cold mark. Once I opened the hood at Bob’s there was very little heat. So this seems to have made the desired improvement. There was one immediate glitch, however. As I backed out of my driveway, I hooked the left support/radiator stop, and bent it down. I didn’t see this until I got to Bob’s. I removed it last night after arriving home and putting it up on the rack, and rewelded it today and reinstalled it. I might need to put some struts back to the crossmember or something, as this quartet of supports appears to be a real weak point in the system. Dragging these braces while moving forward probably won’t do much harm, although I guess one COULD drive up into the back of the fan shroud if I really pounded the ground. But catching it backwards is a guaranteed break-off situation. I augmented the welding on the brace, but clearly something else needs doing there. And notwithstanding the wonderful work JJ and I did, the car needs to come up another inch or more in front, period. The ground clearance is about 3.5 inches right now. I need to raise the back probably two inches as well. Monday I will go to AirMec and see how Morgan reacts to the VERY tight quarters he must negotiate to repipe the condenser. The car ran fabulously in all other respects. The fan guy from CFR Radiators (Don) 909.947.7888 did not send the pigtails for the fans. I will call Monday morning to check on their whereabouts, or otherwise just get new ends for all four fans at my local electronics supply, along with 4 relays. I also need to switch out the engine radiator fan relays for something heavier duty. These are ostensibly 30-amp relays each, but the wiring is at best perhaps #12 or #14, hardly enough for the 8-12 amps I think each fan uses. 6/5/12 I bought 5 more relays, rated at 40 amps each, and hooked up two of them for the charge cooler and trans cooler fans. I simply forgot and did NOT put fuses in line (MY BAD). They worked as planned. BUT, apparently the wires burned on the headers and caused a fire under the right cowl area, AGAIN. This time it toasted the two relays, and crispied up some other wires, with no other ill effects. I am getting two fuses for those circuits, and trying this again. Otherwise, the car ran great. I received a box from Summit with two of the four spring spacers. Nick claims I might just be able to lower the suspension and slip them in. I will check with Marlon about that. 6/6/12 The rear spacers are for BETWEEN the coils, just rubber b locks essentially. NO GOOD. I need further research. Marlon claims about $350 labor to install whatever and re-align the car, all four wheels. Mike at Mike’s Frame says there is no 4-wheel alignment on that car. More research to be done. I started the repair of the fire of the other day. I forgot the relays this time! WHEW! So I cleaned up the wiring in the right cowl “pit” area, remade a bunch of stuff there, added some legs for more amperage capability to the buss, and will have the relays done in the morning. I also put in a missing fused leg to half of the radiator fans. I think Bones or someone left it out when repairing previous header-toasted wires. Here is how that area looks now: It is all looking better under there, and hopefully functioning better as well. 6/7/12 Took a drive over to AirMec and Marlo’s, and all went well. The temp is staying low, up to the “N” on the gauge at most. Marlon feels the stance is stock (I think it is lower). He says it is big money to change out the bushings, A-arms (to get the bushings you gotta buy the whole A-arm), etc. He feels there is nothing worrisome or dangerous or even loose about the suspension as-is. His opinion is that Delrin bushings would be hard-riding. I did receive the front spacers, and they are aluminum cups, and could possibly work. But it’s large dough ($350 labor) to have Marlon or others do it. Once other stuff is handled, I will look to dropping the front suspension and see if we can get the spacers in. The rear spacers are useless. Marlon suggested getting coil-overs (which have adjustable ride height built in), or make an adjustable bottom pad. I certainly can do that. Again, this will be for a little later, after the dually is repaired and can again serve as my daily driver. The temp today was around 90, and the car ran OK. Morgan viewed the condenser, made some comments, and I will deliver it to him (I already have it out) in the morning to get going on the tubing mods. He will do the install and final piping Monday or Tuesday. I will ship the old Dynomax mufflers back tomorrow for credit. Kelly and I did some additional cleaning under the car, and secured some lines and wires a little better. It appeared the oil filter was a tad loose, as Kelly was able to get his gorilla grip on it and turn it slightly. There were some weeps on it. The blower oil drain line continues to show some dripping. Kelly and I repainted some areas under the hood, namely the trim boxes, and did some detailing. 6/9/12 Aside from today being my 68th birthday, yesterday brought some unexpected excitement (NOT good). But first, here are some pix of the underside of the front end, with the AC condenser removed: Morgan is having it welded, and on Monday will do his part on it. I will then, depending on what happens with what you are about to see, continue with reinstalling it, and then take it again back to Morgan for the final piping and recharging. Kelly and I did some more little stuff, including removing the hood, grinding some of the underside unprettiness away, and repainting the bottom of the hood. We reinstalled it, and Kelly noted a star right at the intercooler. Sure enough, the weld that Ziola put on the intercooler to plug the hole was touching. We adjusted the intercooler to what appeared to be enough to provide a few microns of clearance. I took off for tennis, came back, and Dan and Bob and I started off the Bob’s. Approaching Laurel Canyon heading east in the #1 lane at 50 MPH, there was a SUDDEN and LOUD event. I first thought I had hit someone in front of me. The front window was shattered, and the rear view mirror flew back, still tethered, and hit the dome light, both of which in turn hit me. Dan’s mosquito-quick reflexes had his hands up in front of his face instantly, and he suffered no glass in the eyes, nor any damage. I pulled off, went north to the Union 76 station, and pulled in. To my utter shock and amazement, the hood looked nearly unscathed. It is broken at the right rear corner where it did NOT break off at the hinge, unlike the left side which snapped off there. But 90% untouched. The top did not fare so well. Dan sat in the back seat on the way back to the house with a towel over his face to avoid any glass, and I just put on sunglasses. The hood closed and latched and stayed on just fine at 40 MPH all the way home using streets, not freeway I will be sending Grundy some pix in a moment, and requesting a claims adjuster to come see the car. Nick is informed and will come this afternoon to look at it and start an estimate. 6/9/12 Kelly and I returned from the Bothwell event, and we tried some things on the hood. It is IMPOSSIBLE to pull it open on the first latch, and same with the safety. Strange…… very, very strange. 6/14/12 Grundy/Phily has sent an adjuster, and Nick has received an authorization for $4704 of work, about $400 under his estimate. I think there will be a few supplements. I will go over tonight and pull out the hifi from the headliner to allow him to work the top. It was interesting to hear Nick complain about the Bird being damaged, referring to it as “beautiful and perfect” prior to the damage. He does take pride in his work, and respects what a good car it really is. He has mumbled a bit about how he would do the KiloKub, but I hold no hope for that. We’ll get the Bird back in the air with full feathers. I spoke with Morgan who said the condenser passed its pressure test, so is ready to be reinstalled in the car, after which he will plumb it in place. This obviously will not happen for at least a week. 6/17/12 Nick called and invited me over to see how the roof came out. We could not co-ordinate times, so I will look tomorrow. He says it came out great. It’s fascinating to see the headliner and windows out, mouldings off, so dirty, after all our detailed polishing, etc. Rob Anderson did not answer his messages about fixing the hifi (actually just get it hooked back up), nor would Stereo Steve attempt to repair the occasionally-operating shoulder restraints. I will obviously have to do these two things as well. 6/20/12 Rob Anderson has father health problems and is overloaded at work, so is out of the game. Nick is calling in an electrical guy for the shoulder harness retractors, and a girl to come in to do the cracked vinyl dash. I had Nick pull out the package tray, seat belt covers, and third brake light cover for re-upholstery while the rear window is out. The top is repaired and straight (three days work), but not yet painted. Nick had a discussion with the adjuster and informed him there would be some supplementals, and they apparently are in agreement. The car looks like holy hell out there, covered in dust, interior apart, and windows out. But that’s the repair process at a body shop, and it will all look just beautiful when Nick is done. 6/20/12 I talked to Greg Schuk at Monolithic Sound and asked that he send down the three amps for the Bird. Stereo Steve last year surmised they were blown, as he could not get them to produce any sound, but Greg found them to be working perfectly. So some turn on wiring or something is not correct (or not found), and is likely the culprit. 6/28/12 I have not yet received the amps, but did get the Bird back in drivable condition, though not done yet. The top is painted and perfect, the windows are in, the rear window is re-tinted and beautiful, the dash twice repaired. Nick is keeping the hood and moldings and headliner. I took the package tray, rear set, and some small pieces for cleaning or re-upholstery. So Kelly and I, and maybe JJ, will work on the shoulder harness retractors, the hifi wiring, and perhaps getting the carpet redone. 6/30/12 Kelly cleaned up the car and engine compartment, sufficient to take it to Bob’s last night. The car rode fine. There is the exhaust leak on the right, which I may address soon. If it is a stripped header bolt, I may try putting in a stud or two. Monolithic has not yet returned the amps. I will, however, start on remounting the EQ’s in the headliner and doing some research on just what goes where for the amps. The front is LOW, and something must be done to get the car up. 7/1/12 The left-most bolt I put in to hold up the lower skirt had backed off because I had not put a jam nut on it, and was therefore lower than the skirt. THAT I believe was what was just scraping. The left-most radiator support is also perhaps a half-inch lower than the others, so I will shorten that. I have the condenser here, and Kelly and I will install that tomorrow. That will determine pretty much if there is any room to go up. Probably not. The right side exhaust leak is escalating. We might try pulling off the intercooler as well and seeing what is happening on that right header flange.
|

 I
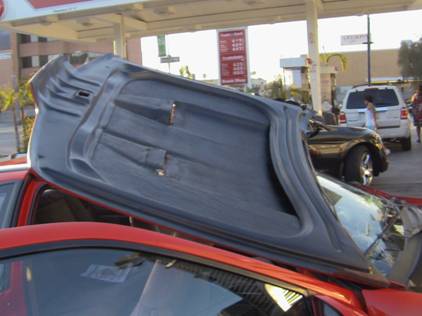
then realized the hood had come up and wrapped itself over
the windshield and onto the top. I was sure it was in a few
pieces, certainly potato-chip like.
I
then realized the hood had come up and wrapped itself over
the windshield and onto the top. I was sure it was in a few
pieces, certainly potato-chip like.