Hemi Cayne Page 2 9/20/09 to 10/13/09
Back to page 1
9/20/09
I
called around to several Mopar guys looking for a rear sump pan, but
nothing solid as yet has turned up. Randy came by Friday, and we spent
some time on the mounts. Randy suggested some changes (good ideas), so I
modified them. We decided to do the following:
Move the left mount up and back, requiring trimming a lot off the actual
engine plate mount, and re-drilling some new mounting holes. This
relocation also allows me to get the long pivot bolt in without hitting
the oil filter area.
Modifying the outer portion of the mount which has the bushing by
relieving the bottom portion to clear the crossmember, and removing the
welded-in mounting bolts.
The passenger side required only the second portion of modification.
The mounts are waiting for a proper pan to allow for an approximately
1.5” thick mounting block to be fitted (tapered to the back because of
the downward to the rear engine angle), drilled and tapped, bolted to
the outer portion of the mounts, and welded to the crossmember. I will
have H&R Machine do this milling operation. This will all appear totally
seamless once done, and the mounts will look unmolested. And I get to
keep the fuel pump in its stock location.
Miranda did not make it over to look at completing the interior. Perhaps
tomorrow.
The speedo cable does not match the 727 trans, so some adaptation will
be required there.
I
also need to get a power booster and master cylinder.
Chris, one of the Rodfathers, again failed to show for the second time
to view the car. He had expressed interest over 2 months ago in the
project, did so again a week ago Monday, and again last Friday night. He
just does not get here, and I don’t have his phone #.
I
am also going to rethink one more time where to mount the trans control.
But I do like the left hand configuration. Some of the early Mopars had
it in the center of the dash. There is no really convenient place in the
middle of the dash on this car.
I
am going to get that new trunk pan in tomorrow, maybe install the new
gas tank, and perhaps pull the bumpers off the #2 car and fit them up.
Anything I can do to make the car more finished has to help.
I
will start ebay looking for some parts, but as noted ad nauseum above, I
have ZERO dough to buy anything, save the pan (and only if I am REALLY
careful not to run out of money before the next rent check comes in). I
am anxious to go through the piles of boxed parts on the other car and
see just what I can start fitting. Probably nothing cosmetic until I can
afford the bodywork and primer. Randy suggested I have the primer done
in satin black, as in a new rat-rod/industrial look. Good idea.
I
still owe Mark $5000 on the engine deal, so I have to be REAL careful
here or I’ll just be giving the install and the car away.
9/22/09
I
did not get to the trunk pan, as I have been on my roof for two days
cleaning gutters, etc. HUGE work.
Tomorrow will be trunk pan welding day. It also should be the oil pan
arrival day as well, which would free me to get over the H&R Machine and
get the mount pads machined.
9/23/09
The pan arrived today. WRONG pan. I am sending it back, and have ordered
the hopefully proper pan from Summit for a LOT more dough. It should
arrive tomorrow or Friday from Nevada. The pickup will be shipped
directly from Milodon, and should arrive shortly as well.
As noted yesterday, I have spent the last few days doing house chores,
including moving some #2 Biscayne stuff around outside in the driveway
(which blocks moving out the Regal. This Regal relocation is required
for the pan work). I will get into that car when the sun sets (it’s 2:57
PM and 102 out there right now). I just MIGHT get that trunk pan started
today.
9/24/09
I
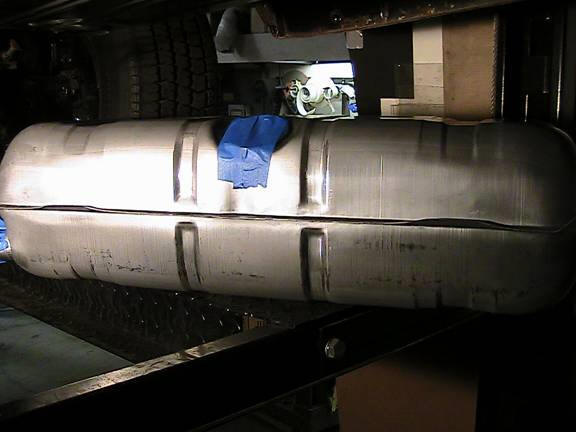
DID get the trunk pan in, and am about to mount the new gas tank.
The old tank looked fine, but the smell of varnish/gasoline says it
needed cleaning out. I did so, and have it set aside for the #2 car if
needed. A new fuel line will be needed for the Hemi. I also will need a
new fuel level sending unit/float, as the old one looks pretty crummy.
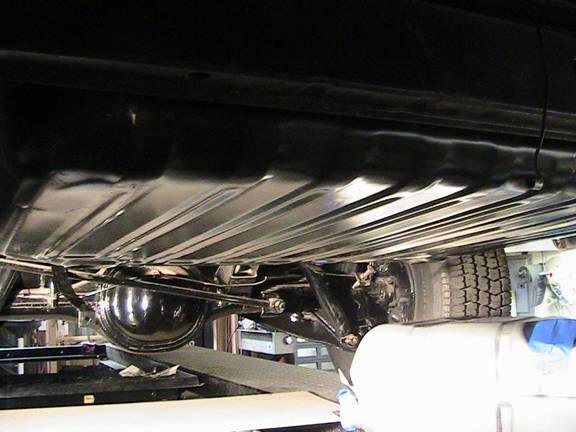
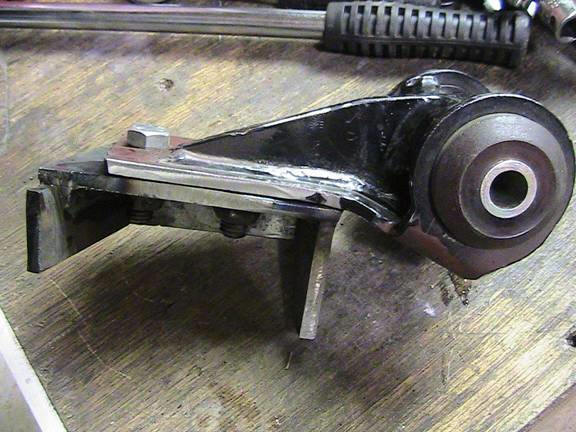
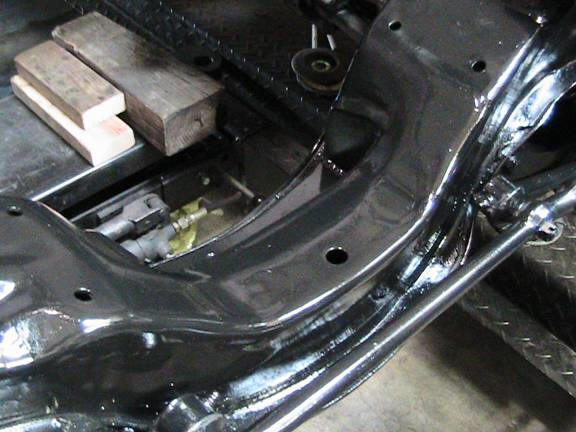
Meanwhile, here are two shots of the front mounts without the oil pan.
If you look closely you can make out the gap where I will machine some
spacers to receive the mounts. This first shot is the left (driver’s
side) mount, and the end of the steering box shaft is at the bottom. The
partly primered mount arm is extending off its pivot behind the oil
filter and pressure regulator adjustment nut. The left upper A-arm shaft
is just above the mount arm here.
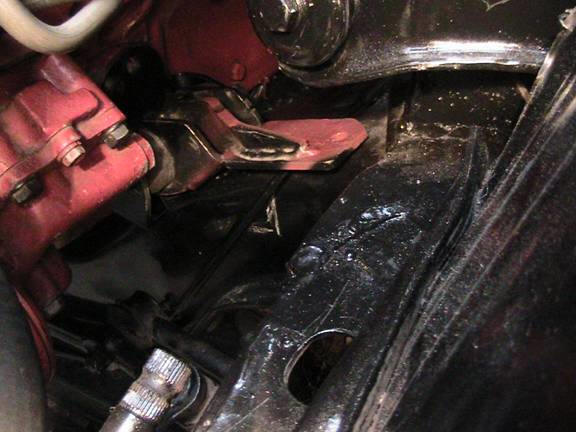
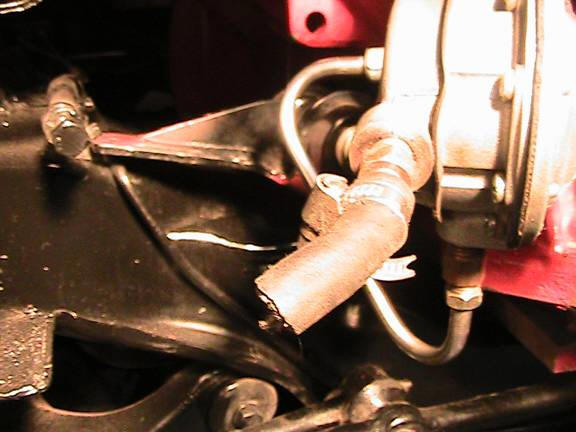
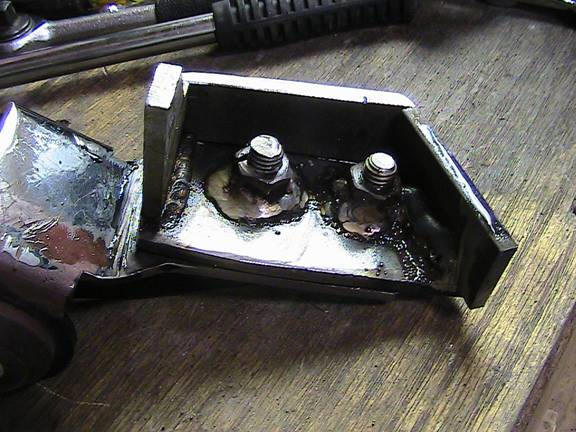
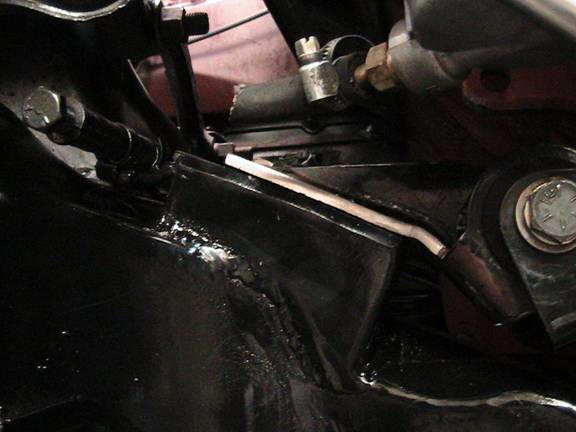
This next one is the right mount, nestled in behind the (for the moment)
detached fuel pump. The pivot bolt for the mount is serviceable, a good
thing. It is barely noticeable in the fuel line loop area. The mount arm
on this side is laying on the right side brake line. There will be about
1.5” in between those two points when finished, filled with the machined
spacer block.
9/25/09
The correct pan and pickup arrived today. The pickup is SOOOOOOOO long I
have to pull the engine OUT of the car to install it! I am mocking up
the foam spacers for the mounts now. I’ll do a couple of iterations and
get them really close, then go to Al on Monday for some machined steel
blocks.
I
am just welding the retainers for the gas tank now, having gotten some
fresh bolts for the straps, and a pair of 6” long bolts for the rear
trans mount (to allow me to tilt the engine up. I may have already
pulled the threads out of one side of the trans case/mount.
9/26/09
Spent a couple of hours today mocking up the foam mount pads. I think
I’ve got it close enough. I’ll visit Al Monday and see what he can mill
up for me.
I
don’t know if the engine will settle once it is bolted in. If so, then
I’ll have to come up with some shims and do a little oval work on the
mount holes.
I
put some extenders on the bolts for the gas tank, and got it pulled up.
It will have to come down later for fuel line, sending unit, and
connection to the filler neck. But for now it is up. I will probably
repipe the front brake lines given the welding to do on the crossmember,
and a newer master cylinder to come.
9/29/09
Randy spent the day here yesterday, making some VERY cogent
observations, and saving my butt from a costly fuel pump mistake. How
did I get this far without him helping? I’m serious about that. I DID
manage to slice my left index finger on the pan, however, with NO help.
I cut the center back half of the crossmember out to allow the motor to
slide in with the pan on, and will have Angel do some welding in that
area tomorrow. I can do it, but he wants to help, needs some dough, and
we can work it out.
Roy was here today, and we spent most of the day chasing Condor parts,
and did little on the HEMI-Cayne.
Al at H&R passed on machining the mount blocks, so I made another
pattern in paper and will start cutting out pieces of ¼” steel tomorrow
to have Angel weld up the pads. I also found some patch panels in the #2
car for the rear fender lips, and I MIGHT have Angel install those as
well. He has some experience doing this for some custom car shops.
I
also found a second u-joint for the steering column. Randy and I did a
little mocking up and it appears I can use the Ididit column and still
go UNDER the left A-arm, and clear the potential header location. A
shorty (16”) column to replace that one for the KiloKub is almost $500.
OUCH!
I
thought I had pulled threads on the trans case. It turns out I had
inserted a smaller diameter bolt (3/8” instead of 7/16”), so things
MIGHT be OK there. The engine and trans slipped back in with the rear
crossmember in place. I still need to make up an approximately 3” tall
spacer between the trans and crossmember. For now I will look for some
Grainger doughnuts like I used on the Duramax engine front mounts. I MAY
need to put a sleeve in them for the 7/16” bolts, as I seem to recall
those mounts were ½” diameter. I’ll check tomorrow.
In searching for rear end components it appears a center section is
closer to a thousand bucks, and axles about $330. I may not need any
beefier axles. I’ll need to search for some cheaper deal on the rear
end.
Disc brakes are also close to $1K for all four wheels. I already have
brand new wheel cylinders for the drum brakes. We’ll see how that all
plays out down the line. I found a black 7” master and chromed booster
for $200 on Summit. Gotta wait on buying it, but that looks real good to
me.
9/30/09
Angel joined me today and will again tomorrow for the making of the
mounts. I did more pattern-making, this time out of paper, and he did
most of the cutting grinding, and welding. I did the pattern-making
fitting (DOZENS of in and outs of the mounts), clean-up, getting tools
in place, and some fine tuning.
Here’s the right mount partially made:
Angel expressed amazement at the pattern technique. The pix below show
the left mount tacked in without the engine in the way. We tacked it in
place, one piece at a time, until it was solid enough to hold the motor,
then leveled the engine and went about doing the right (passenger) side
mount in similar fashion. This was ALL day with two guys working
non-stop We’ll have another whole day tomorrow finishing the tack-in of
the right side, pulling the motor and finish-welding of the mounts.
I
also located the other u-joint for the Ididit column, and it appears
getting the steering linked in will be relatively easy although some
stand for the upper joint will likely be needed.
I
showed Angel some rust repair areas, and we’ll get into those down the
line. For now, it is the major welding we are addressing.
10/1/09
We removed the engine and trans to allow for more complete welding of
the mount pads. Each mount required 5 separate (and distinct from one
another) pieces, laboriously fit and re-fit until correct. This is all
cut out of ¼” steel.
Then we
need to box in the cutout in the crossmember (made to clear the oil pan
on install and removal). Without the cutout in the crossmember getting
the motor in and out would be nearly impossible, notwithstanding how
close the tolerances were to actually slipping it in. That’s what is
maddening. It is SO close but you gotta do what you gotta do. I don’t
know as yet if I can actually get the pan off the motor after it is in,
even with raising the engine up 5 inches or so in front. We shall see.
10/1/09
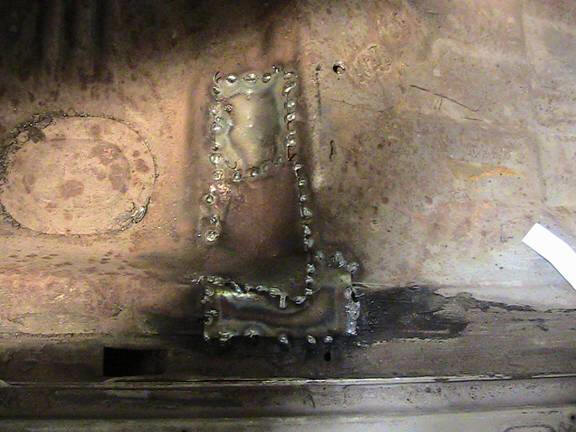
Angel and I finished the mounts, and they look great.
I
am now working on finishing the boxing of the crossmember. It looks VERY
strong and trick.
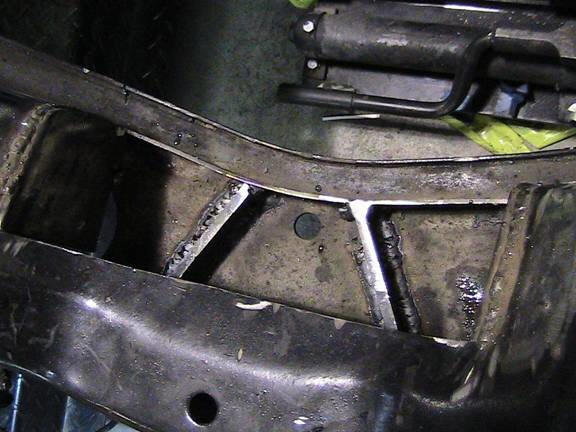
The top of the picture is toward the rear of the car. The two V-ribs
will tie the floor of the crossmember to the box, when the plate is
welded in as the “floor” of the box. The left and right sides and the
piece going closest to you will all go to the floor, and tie it in
further. Then that floor will tie it ALL together. This is now the
strongest part of the crossmember.
Here is the floor welded in. This is NOT TIG-welding, although it looks
like it.
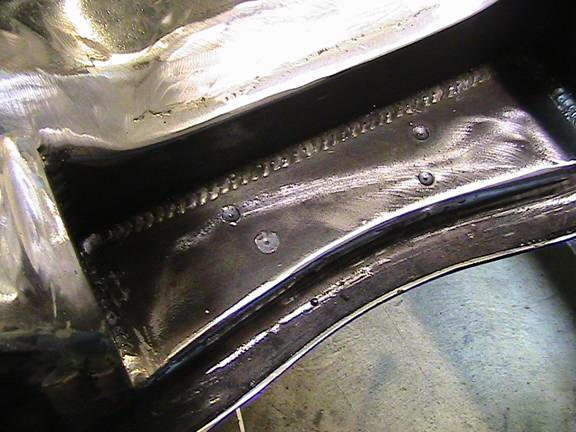
The four holes are the anchors points which weld the floor of the box to
those ribs below. The three surrounding sides (all ¼” steel) go down to
the bottom of the crossmember. You can now see how strong this area is.
We will endeavor to get the engine and trans back in the car and see
just how they bolt back up. They looked great before pulling them out.
We also need to build up the rear trans mount with the aforementioned
Grainger’s doughnuts. I have ZERO dough (well actually $4.54 TOTAL). My
front renter is late with he payment, so I am STUCK.
10/2/09
The renter did NOT show. So I managed to scrounge $6 from a recycling
center for a trash can full of bottles and cans, bringing my TOTAL cash
on hand to $11. And ate lunch at home. Angel and I finished the mounts,
ground everything smooth, primed and painted the area:
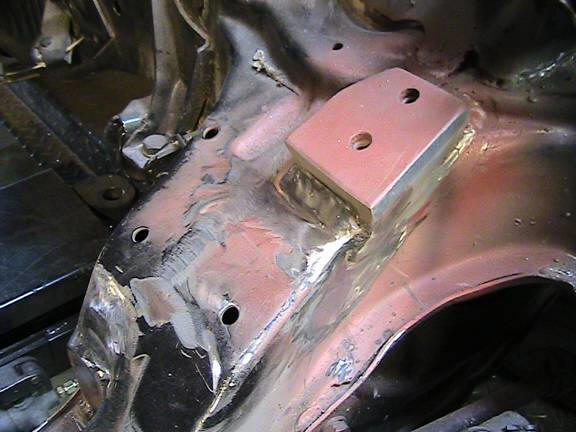
and set the motor back in. Here are some more shots of the state of
affairs. This is the right side mount with the engine back in place.
The boxed area is really excellent looking, and the welds are primo.
Below is a shot of the left (driver’s side) mount. The pink is primer,
not bondo.
It took a little working to get the bolts to line up, but really not too
bad. We shortened the bolts, and I slightly opened the holes in the
Schumacher mounts.
The car is off the rack, and looks kinda cool.
I’d love to get to the bodywork.
I’d love to finish the whole car.
I’d REALLY love to have someone buy the project RIGHT now.
10/3/09
No pix yet, but we had a busy day. Angel and I mounted the front of the
beam, after Angel blow-torched it off. I nailed a 2x6 between two NEW
152” long studs, so now the engine hoist is more secure. I will do some
metal brackets under the 2x6 for added protection, and drill some screws
through the beam into the header to hold it in place. Once the MDF goes
on the wall, the beam will be further locked in place.
Angel hounded me into tearing OUT the new trunk pan so he could do a
better job of cleaning up the mounting. Actually, he got completely
sidetracked and ended up blowing out dirt and sand and wire-wheeling off
rust and paint in the trunk and UNDER the car to the rear wheels. This
necessitated blowing out the garage a DOZEN (literally) times with a
leaf blower, vacuuming numerous times, and washing the place down.
Tomorrow Angel will primer the underside and remount the trunk pan. We
MAY put the gas tank up, or wait for the filler neck assembly, sender,
and some wiring mods.
10/4/09
All was going well, until I got home today, and Angel had cleaned the
upper area of the trunk, welded the trunk pan back in, and made the
corner patches. This was 6 hours of work. I asked if it took him 5 hours
to weld in the pan, and he said yes. I simply said, “Wow.” No
criticism, just the single word.
Angel then did one of his (at this point in history) fairly predictable
hissy fits, started complaining about how he was to get paid, got up on
his “A” horse and changed the rules on his “time”. It is stunning how he
manages to do this combative stuff. He invents criticism where there is
none, and goes BALLISTIC on his own response to his OWN stuff! So this
has happened enough, and I don’t want any more of this in my life.
He is now DONE with the project.
OK, then.
I
bought a couple of cans of Satin Black primer, and sprayed the right
front fender and door area just for a look.
I
also got two more 6” bolts for the trans (remember I bent these lifting
the front of the motor a little while ago). These are temporary, as I
really need grade 8 bolts at 5.5”. I still need to go to Grainger’s for
the doughnut mount pads.
I’ll finish grinding the welds around the pan, do some caulking in the
corners of the trunk, and apply some primer to the area.
I
MIGHT take the wire wheel to the interior of the car and clean it up and
get it primered. I have a can of rust locker to use on the interior
metal prior to upholstery.
I
might also kick the front window out, and open that metal to some
correction.
I
cannot take the car to Ken’s guy for bodywork until I have cash. It
appears at this rate that JJ and I will just do all the body prep and
repairs.
I
can work on the steering column, perhaps notch in the shifter box at the
left side of the dash, and trial fit a Duramax radiator in the core
support.
10/5/09
Randy dropped by today, and as usual made some cogent observations and
spurred me to action in a few areas. One of these was to remove the
motor (actually just disconnect the mounts and lift it about a foot),
and try fitting some TTI headers. They really don’t fit. So we dropped
it back down, clearanced a portion of the left side mount, and with some
effort got the mounts to line back up. We spent some time on the
computer looking for headers, and I called Sanderson. They appear to be
the only ones with a block hugger header for the 426 Hemi, and offer a
return policy if they don’t fit. So I will, when money permits, order a
set, trial fit them, and if they work, return them for a ceramic-coated
set.
Randy thought I should put the windage tray in the motor, as I had
removed it when fitting the new pan. This is not critical in any way but
I will likely do so. I need some new gaskets, as it appears Mark ran the
pan bolts a wee bit tight and one of the two gaskets had some splitting
at some holes.
I
tried a Duramax HUGE radiator-way too big. It won’t fit between the
fenders, and is too high. We also did some Internet hunting and found a
31 x 17 unit reasonably priced around $180 that looks like the ticket.
It will require some core support mods, no big deal.
I
will use the RF fender off the #2 car for less bodywork.
We set the hood on and by golly it FITS! Clears the motor and
everything! The hood scoop that came with this hood works perfectly over
the carburetor, including an old 13” Tbird chrome air cleaner I had
here. That is a lovely deal right there.
I
will investigate a rubber mat for the trunk and pan, and if findable
(Randy assures me it is), I’ll just shoot some primer on the whole area
and leave it at that. John Jarnagin has agreed to come on board and
start working the remainder of the paint and bodywork. He and I work
wonderfully together, and this will be a pleasant turn of events. We’ll
get started either tomorrow or Wednesday, depending on how a small job
view goes in the morning.
10/6/09
We did not get back until later in the day after completing the job, and
JJ and I spent a couple of hours on the trunk. I welded in three
patches, he ground them down, and I primered the area. JJ will bring
some bondo and 100# paper for the DA, and we’ll start removing the
surface rust from the body. I did a little on the hood area with the DA
using 220#-waste of time. I did some with a flap disc on the grinder,
but that, too, loads up quickly and would require DOZENS of discs. We’ll
see how the 6” DA works tomorrow. And yes, JJ and I work well together.
10/7/09
John and I continued today stripping the hood using a combination of a
6” DA, long board sander, and a Scotchbrite pad on the grinder. The
latter was the most effective. We also used some small air-powered
die-grinders and a wire wheel. We have the top and part of the underside
done. Tomorrow should see the whole hood ready for some primer.
Meanwhile, I spent my most of my time in the trunk doing some grinding
and bondo work. I have made about a dozen passes over the trunk pan
seams and the repair areas. I am obviously not making up large batches.
It is looking pretty good now, and I’ll shoot some pix tomorrow before
and after the primer goes on both areas. I spent about $100 today on
bondo hardener and sandpapers for the long board and DA. JJ and I will
also have to address the rear quarters and make some patch panels BEFORE
we but out the old stuff, of course.
We looked at the interior, and the front door panels (metal) look
perfect, and are already primered. We will probably have a hard day of
work in there. The headliner area will be the killer, of course. We also
found a couple of very small holes in the floor pan, which I will
address in the next few days. I will replace the driveshaft tunnel a
little later, once the trans mounts are done.
John is going to bring over his mini-sandblaster, a gift from Randy, and
we’ll see if it affords us some utility in getting at hard-to-reach
areas.
These are the times of very hard work that do not show obvious and
impressive results, but do add to the overall quality of the build.
Gotta do it.
10/8/09
John picked up some play sand, and it was too large and too wet. We went
to Balboa Brick and got a 100# bag of #60 silica. PERFECT. John has
spent several hours blasting the underside of the hood. This unit will
work very well for getting into the drip rails on the top, around the
doors, and other hard-to-reach areas.
I
have continued smoothing out the trunk area. Almost done. Perhaps one
more pass tomorrow with some minor-flaw filling top coat (actually
concentrated lacquer called Nitro Stan). If I were to wrinkle finish the
area, it would be perfect at this point. I’m just being real anal about
it. It is good practice for doing the rest of the car.
10/10/09
The trunk is essentially done:
I
am now working on filling some holes in the front floor pan. One done,
one to go.
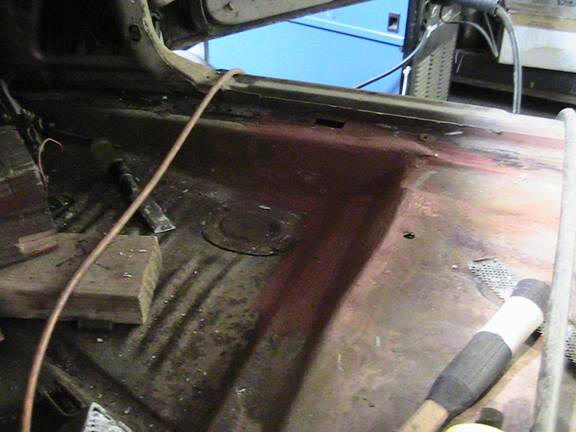
The crossmember under the right side was rotted away, so that got three
pieces of metal welded in to restore that, and some bondo and primer to
maintain a real clean look.
John and I got the windshield out. It is tough removing trim without
damaging it, particularly if we don’t know if it is screwed or clipped
in. Turns out the front window perimeter trim is screwed to the body.
The side pieces were not. We got the window out, dumpsterized, and the
trim removed. John then cleaned the sealing surfaces. They look good,
but we’ll put one more pass with a wire wheel and some lacquer thinner
before shooting some primer there.
John also took the cowl piece (a ZILLION slots) and sandblasted it both
sides. It is PERFECT, and looks brand new. The little sandblaster of his
is working out to be a real gem.
I
spread the word about the HEMI-Cayne at both Bob’s last night. A guy
named Jerry, who had a couple of 58 impalas, and has been here, may come
over to look at the other Biscayne (409) project.
The driver’s side repair is done, and the metal work and welding were
excellent. I covered it with bondo anyway to smooth out the floor.
10/11/09
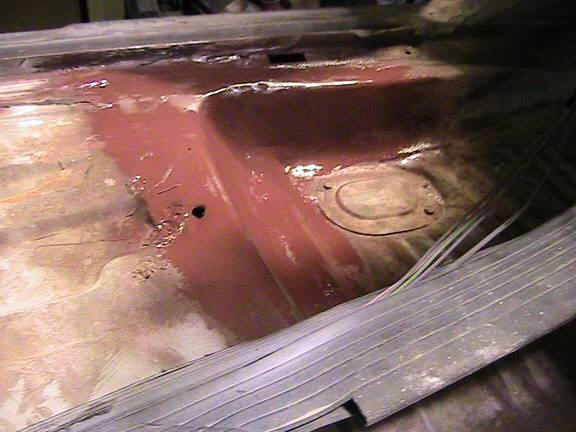
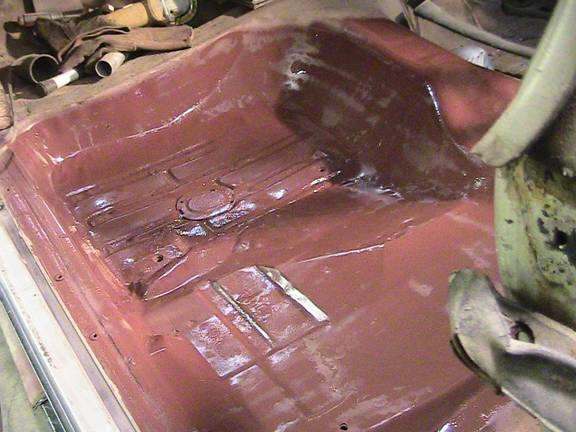
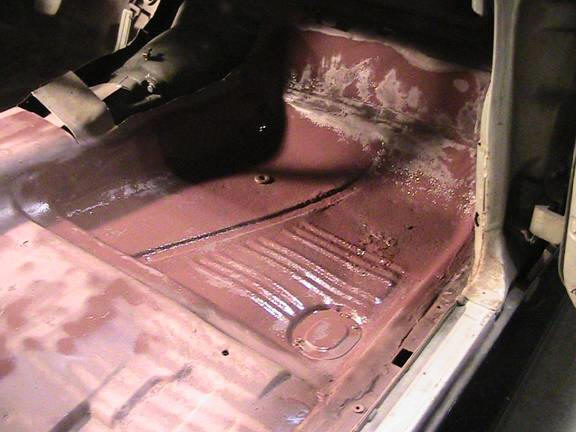
I
did the two front floors finishing, and primered the right rear floor
pan and the right front pan:
John returns tomorrow and we’ll hit the other sides or perhaps attack
the underside of the top and work down to the floor over there. I need
to get some sanding discs for the little air grinder.
10/12/09
What we did today instead was sandblast all the exterior tough places.
We removed the rear window (again, how would one know if there are
screws in the trim?), and got it out unharmed (both glass and trim). I
have not cleaned it yet, so I don’t know if it is usable. I do have a
boxed replacement for both front and rear glass (used, but purportedly
very good).
We burned through a nozzle on the blaster, got another from Baida, and
John did a great job. While John was finishing blasting, I blew out and
hosed down the garage. We cleaned the car and driveway (LOTS of
vacuuming), and rolled the car into the front bay. I sprayed all the
recessed glass areas, around the windows, etc. with satin black primer.
We’ll roll it out again tomorrow, get some more sand, and start on the
interior.
10/13/09
We did NOT roll the car out today, as it rained. We instead worked on
using the long-board air sander, got a bunch of other sanding discs and
supplies, and bought another KILLER grinder at ACA (A Cut Above), and we
went to work just sanding inside, vacuuming, etc. The garage has gotten
cleaner every time I blow it out, so we’re working on avoiding wholesale
dirt production.
JJ sanded all the areas I primed, Randy came by and gave us more good
suggestions, and JJ and I sanded until late afternoon. I did the
passenger side of the top of the car, and it is ready for primer. JJ did
the shoulders on both sides (from the windows down to the first change
on the doors and fenders) by hand, and those areas look great. I got
more primer today, and he and I will prime those areas in the morning.
While we are waiting for those areas to dry, we can do a lot of garage
organizing. We might go ahead and do the remainder of the driver’s side
of the top, and a few other areas first, THEN prime those areas.

|